

Most commercial roof problems are visible before they become expensive. The trouble is that most property managers don’t know what they’re looking at when they’re up there, so small deficiencies compound quietly until someone calls about water coming through a ceiling tile.
This checklist gives you a structured way to walk a commercial flat roof and document what you find. You need good eyes, a phone camera, and the discipline to do it twice a year.
If you prefer to have a professional handle inspections, our professional flat roof assessment team can provide a written condition report with repair priorities and estimated remaining life, which most institutional landlords and property insurers now expect.
Before you go up: safety and access requirements
Ontario requires fall protection when working within 2 metres of an unprotected roof edge. If your building has guardrails or a permanent fall arrest anchor system installed, confirm they’re rated and in good condition before putting weight on them.
If your rooftop does not have compliant edge protection, you should not be up there without a proper harness and an anchor point rated for the activity. Our rooftop safety system installation team installs permanent guardrail and anchor systems that make routine roof access safe and code-compliant.
At minimum before any roof walk: check weather (don’t walk a wet membrane), tell someone you’re going up, wear soft-soled shoes, and bring your phone for documentation.
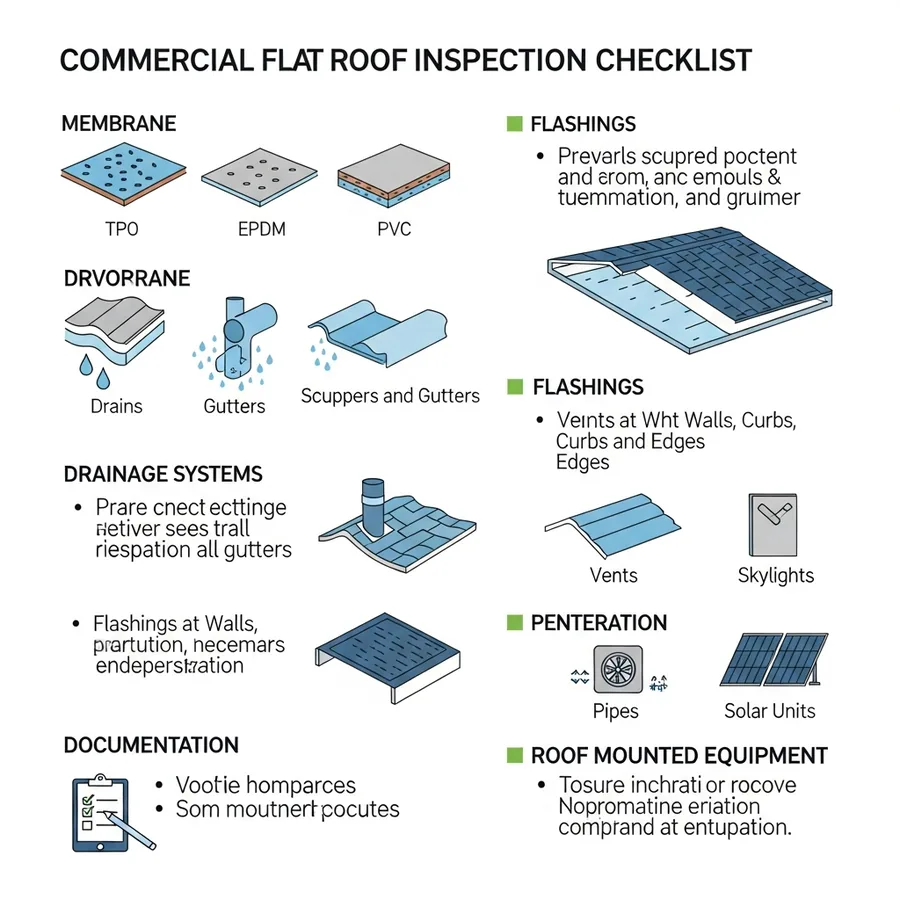
Membrane surface inspection
Walk the full surface area in a grid pattern rather than wandering. You’ll miss things if you don’t systematically cover the roof.
Blistering. A small blister under 6 inches in diameter that feels firm is usually a cosmetic concern. A large blister or one that feels soft and spongy when you press it means there’s moisture or air trapped in the assembly beneath. Mark it for professional evaluation.
Cracks and splits. Any visible crack in the membrane surface is a potential water entry point. Particularly watch the perimeter area within 2 feet of parapet walls, where thermal movement stress concentrates.
Open or lifted seams. Run your hand along seams. On TPO and PVC, seams should be solid and fused. Any seam you can get a fingernail under is a problem.
Granule loss on modified bitumen. Patchy areas where the granule surface has worn off expose the underlying asphalt to UV. Widespread granule loss is a sign of accelerated aging.
Surface debris and ponding water. Standing water 48 or more hours after rain is a drainage problem. Check if drains are clogged. Debris mounds trap moisture against the membrane.
Drainage system check
Every drain, scupper, and overflow drain on the roof needs to be clear.
Roof drains: remove the strainer and check the drain body for debris. Pour a bucket of water slowly and confirm it drains at a reasonable rate rather than backing up.
Scuppers: look through them from the roof side. Any bird nesting material, leaves, or debris blocking a scupper is a potential ponding problem during heavy rain. Ontario had several significant late-summer rain events in 2024 and 2025 where blocked scuppers caused interior flooding that proper drainage would have prevented.
Overflow drains: these emergency relief drains are set higher than primary drains. If they show signs of consistent flow (rust staining, debris rings), your primary drains aren’t doing their job.
Flashings and terminations
Flashings are the strips of material that transition from the membrane surface up and over any vertical element: parapet walls, expansion joints, curbs. They’re the most common failure point on commercial roofs.
Base flashings. At every parapet wall, the membrane should turn up the wall face a minimum of 8 inches. The termination bar at the top should be firmly anchored, with sealant at the top edge intact. If the sealant is cracked or the termination bar is pulling away, water can get behind the flashing.
Expansion joints. These should have a continuous flexible bellows or cover above them. Any cracking or splitting in an expansion joint cover needs professional repair because the joint is designed to move, and a rigid repair won’t last.
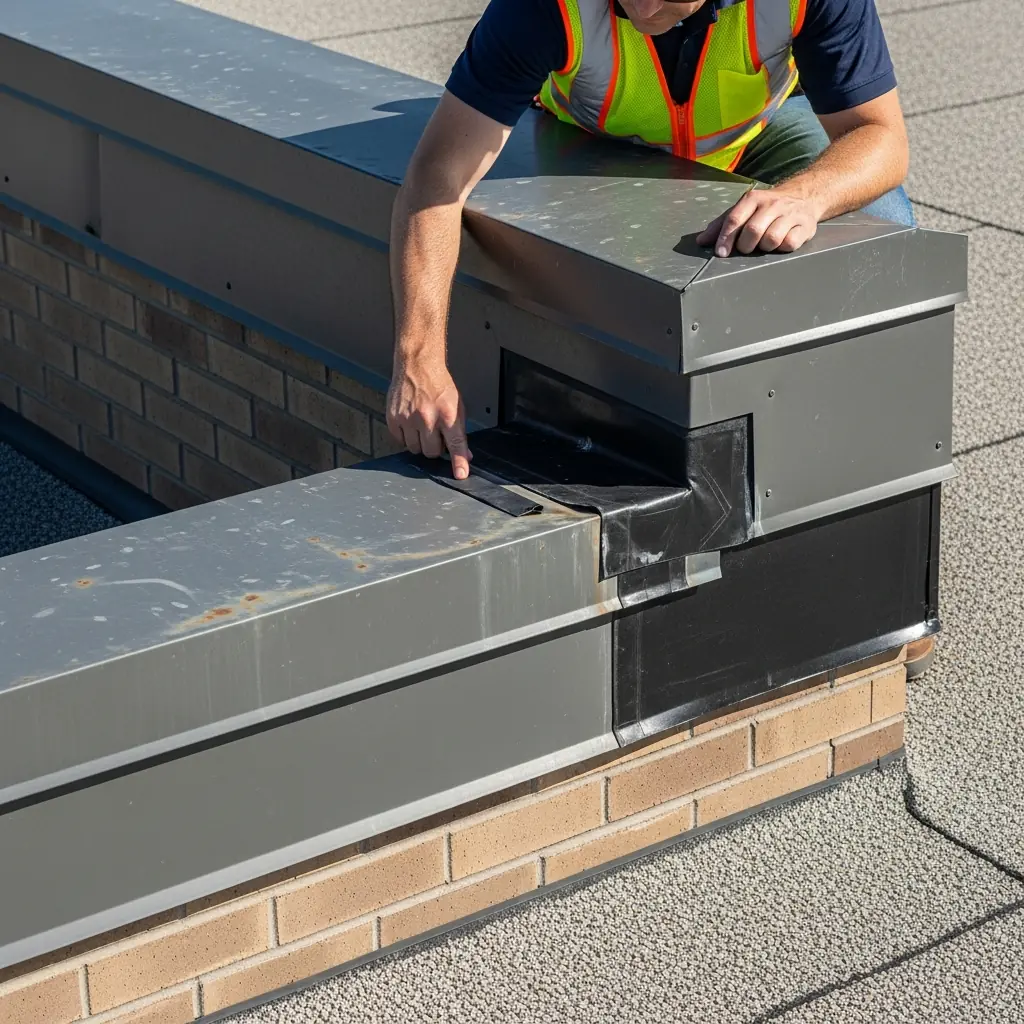
Penetrations and equipment curbs
Every penetration through the membrane is a potential failure point. On older commercial buildings, penetrations accumulate over years of tenant improvements and HVAC upgrades, sometimes with no formal flashing at all.
For each penetration, check is there a proper curb? Is the flashing continuous and in contact with the curb sides? Is sealant at the top of the curb flashing intact and not cracked? For conduit, is the entry point sealed?
Pay particular attention to areas where multiple penetrations cluster together, typically around HVAC units. Crowded penetration areas are hard to flash properly and often have overlapping repair history that creates complex water paths.
Rooftop equipment condition
You’re not doing an HVAC inspection. But the condition of rooftop equipment affects your roof.
Condensate discharge: HVAC condensate should discharge through a proper line to a drain. If condensate is draining directly onto the membrane, it concentrates water in one spot and can contain refrigerant oil that degrades some membrane types over time.
Unit mounting: check that equipment legs are sitting on proper curbs or isolation pads, not directly on the membrane. Equipment resting directly on the membrane creates abrasion and puncture risk during servicing.
Parapet walls and coping
Parapet walls are the short walls around the perimeter of most commercial flat roofs. They take significant weather exposure and are a common source of leaks that appear to come from the roof but actually enter through the wall.
Coping: the metal cap on top of the parapet should be continuously seamed with no open joints. Water that enters through a coping joint runs down inside the wall cavity and can exit at ceiling level inside the building, nowhere near the roof perimeter. Property managers frequently assume the roof is leaking when the actual failure is coping.
Mortar joints: on masonry parapet walls, check mortar joints for deterioration. Spalling brick or eroded mortar is a water infiltration path that has nothing to do with the roof membrane.
Documentation: what to photograph and record
After every roof walk, document what you found. A photo log that goes nowhere is useless. For each deficiency, take a wide-angle photo showing location relative to a fixed reference, take a close-up of the defect, and write a brief description of what it is and approximate size.
Keep this documentation in a folder per building, organized by inspection date. When you’re negotiating a capital repair budget or making a warranty claim with the membrane manufacturer, this record is what gets decisions made quickly.
When to call a professional
Do the semi-annual walk yourself. Call a professional when you find a blister larger than 12 inches, there is standing water that hasn’t drained within 48 hours of the last rain, a seam has opened, you find any deficiency you can’t clearly categorize, the roof is over 15 years old without a recent condition assessment, or you’re buying, selling, or refinancing the building.
A professional flat roof inspection includes non-destructive testing, documented condition ratings, and repair prioritization. If you suspect wet insulation, add infrared scanning to the scope. An infrared scan after a clear day will show thermal anomalies where wet insulation retains heat differently from dry areas.
Frequently asked questions
How often should a property manager walk a commercial roof?
Twice a year as a minimum: spring and fall. Add a walk after any significant weather event and after any contractor does work on or near the roof.
Can I do my own roof inspection instead of hiring a professional?
For a general condition check, yes. For a formal condition assessment with a written report or warranty claim documentation, you need a certified roofing contractor. This checklist is for the former and helps you catch developing issues early.
What should I do if I find a blister?
Do not probe it. Do not try to fix it. Photograph it with a reference object for scale and note the date. Then call a roofer. Blistering indicates trapped moisture or air in the assembly and the repair scope depends on whether it involves wet insulation.
Do I need to be on the roof to check for leaks?
No. Water stains on ceiling tiles, efflorescence on masonry walls near the roofline, and rust marks on steel columns near penetrations all indicate moisture infiltration. Map those interior signals to the roof directly above before your walk and you will know where to focus.

Written by
Greg V.
Commercial Roofing Systems Specialist
Greg specializes in the technical standards of commercial and industrial flat-roof projects across the GTA. He focuses on the mechanics of full-tear-off and re-cover operations for warehouses and manufacturing plants, providing insights on scheduling roof work to maintain operational continuity.